IMPORTANT PARTS
| Time | ~ 15 minutes |
| Level | Getting starded |
| Difficulty | EASY |
Introduction
The camera body is the brains of the operation; the main frame with all buttons and such where you attach the lens to. It houses all the electronics, the sensor, battery, controls etc. In this chapter we will discuss the primary controls and elements you find on the body.
THE CAMERA BODY
Without the lens attached, this is what a camera body looks like. Yes, it can be overwhelming but don’t let it distract you. For now we’ll only focus on the things you will use most, if not every, time. Depending on the brand and model of your body, buttons may look a bit different or have a different position. If you are unsure, please refer to the body’s manual. Lets break it down!
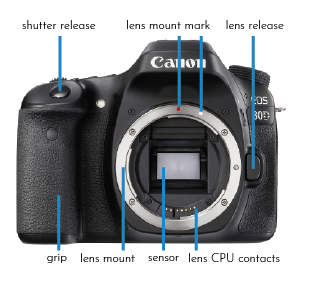
LENS MOUNT; the mechanism used to connect the lens to the body.
LENS MOUNT MARK; an indicator showing the right angle to mount the lens. You will notice that on this mount, there is a red circle and a white square. On the side of your lens, near the mount, you will also find a white square OR a red circle. If you line these up, you know you’ve positioned your lens correctly. Now you can click it in, and twist to lock it in place.
LENS RELEASE; to release the lens, press this button. Now gently twist and pull your lens off the body.
LENS CPU CONTACTS; metal pins that will provide a connection between the body and the lens. This connection allows the body to send and receive data from the lens and drives the autofocus system.
SENSOR; one of the first things you’ll probably notice is this square right down the middle. What you are looking at is the mirror (absent in mirrorless cameras) that directs the image to your eye when looking through the viewfinder. Behind this mirror you will find the camera’s sensor. When you make a picture, the mirror flips out of the way, allowing light to pass onto the sensor. The information gathered by the sensor is then processed by the camera into an image file.
GRIP; An extension to comfortably grab your camera. In most camera’s, the inside of this grip will house the battery, which can be changed throught a latch in on the bottom.
Now, onto the back of the camera. Don’t get overwhelmed by the amount of buttons and dials. I’ll let you know which ones are the most common.

MENU BUTTON; this button lets you enter the camera’s menu directly. Here you’ll find all settings and options. We’ll leave that for now.
VIEWFINDER; the eyepiece that lets you look through the camera. Make sure you removed your lens cap or you won’t see that mutch.
PLAYBACK BUTTON; Made yourself a picture? Great! Press this button to view your image and it will appear on the LCD screen.
MEMORY CARD SLOT; all images need to be stored somewhere. That somewhere can be an SD card, or the less known CF card (which looks like an oversized SD card. It has several benefits over the SD card, but we’ll get back to that in another chapter).
BATTERY; on the bottom you will find a little hatch of which behind the battery is stored.
MENU DIAL; is used to navigate the menu. Depending on your camera brand and model, this can be either a dial or buttons. In the middle you’ll find the ‘set’ button, which you will use to confirm any selections you make within the menu.
LCD SCREEN; the screen that will show you all important stuff your camera does. It shows you the settings, lets you review your images, flip through the menu and many more. But that isn’t too surprising, right?
We flip the camera once more and have a look from above.
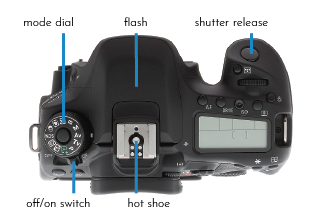
MODE DIAL; this dial lets you change the mode you are shooting in. The most known mode is the ‘auto’ mode, for a full automatic experience where you only point the camera and press the shutter button. There are several semi-automatic modes, letting you change a single specific setting. Further down the line we have the full manual mode in which you are in full control of the settings, and some custom modes in which you can preset parameters. On most entry level bodies you will also find seperate modes for sports, landscape, backlit situations, etc. To turn the dial, you need to push the lock switch in the middle, allowing you to switch modes.
FLASH; next up is the flash. Some bodies, mostly of entry-level, have a build in flash, hidden away under a hood right behind your viewfinder. It pops up from it’s secure hiding spot when it’s needed. How convenient, but you’ll have to push it back in (as always; gently).
OFF/ON SWITCH; does wat is says it does; switches off or on the camera, depending on its position.
HOT-SHOE; which is not actually ‘hot’ as in temperature. This is a mount where several accessories can mounted to the body. There are two kinds of this mount; a hot-shoe and a cold-shoe. A hot-shoe will provide data connection between the body and the accessory, where the cold-shoe only lets you mount an accessory and that’s it. Most common accessories are external flashes or transmitter units to remotely control off-camera flashes.
When you are able to memorize these buttons, dials, switches and parts, you made your very first hands-on step into photography. Congratulations!
THE LENS
While the body may be the brains of the operation, it’s near worthless without a lens. It shapes the way you see the world and alters perspective. Inside the lens you find a series of optical elements to bend and shape the light in the right way onto the camera sensor.
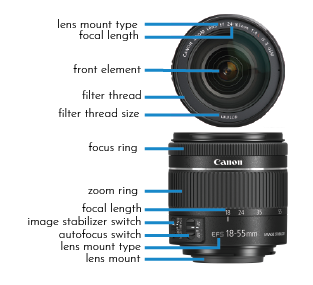
LENS MOUNT TYPE; tells us what mount is on the lens. Comparing this to the mount on the camera body will tell you if it will fit.
FOCAL LENGTH; the ‘zoom range’ of the lens. Later more on focal lengths.
FRONT ELEMENT; the glass element in the front of the lens. Multiple optical elements are located behind the front element to shape the light.
FILTER THREAD; a thread to screw in filters for additional control/creativity.
FILTER THREAD SIZE; an indicator telling you the diameter of the filter thread size. You’ll know what sizes to buy and which won’t fit your lens.
FOCUS RING; adjust the focal plane
ZOOM RING; used to ‘zoom’ in or out. A better description would be to alter the image perspective.
FOCAL LENGTH; an indicator that tells you what focal length the lens is currently in. Later more on focal lengths.
IMAGE STABILIZER SWITCH; lets you turn off/on the stabilisation system. Can be used to get more steady shots.
AUTOFOCUS SWITCH; turn off/on the autofocus system.
LENS MOUNT TYPE; States the mount type of the lens.
LENS MOUNT; the actual mount that mechanically connects the lens onto the camera body.
THINGS TO REMEMBER
- Shutter release button
- How to change modes
- How to open and navigate the settings menu
- Different parts of the lens mount
CHALLENGE
Difficulty: MEDIUM
- Explore your camera’s settings menu using the appropriate buttons. Don’t change anything for now. If you accidentally made some changes you can always put it back to factory settings. How to do so is explained in your camera’s manual.
- Try to operate the mode dial and view some images on the LCD screen. You can use the menu dial to navigate back and forth between images.
UP NEXT
Keep learning and continue to the next chapter. Don’t forget to take a break between each chapter.
Title: n/a
Time: n/a
Difficulty: n/a
0 Comments